
How to Fix a Pixelated YouTube Thumbnail Online
Learn how to fix a pixelated YouTube thumbnail online using better resizing, image enhancement, sharpening, compression, and export techniques.
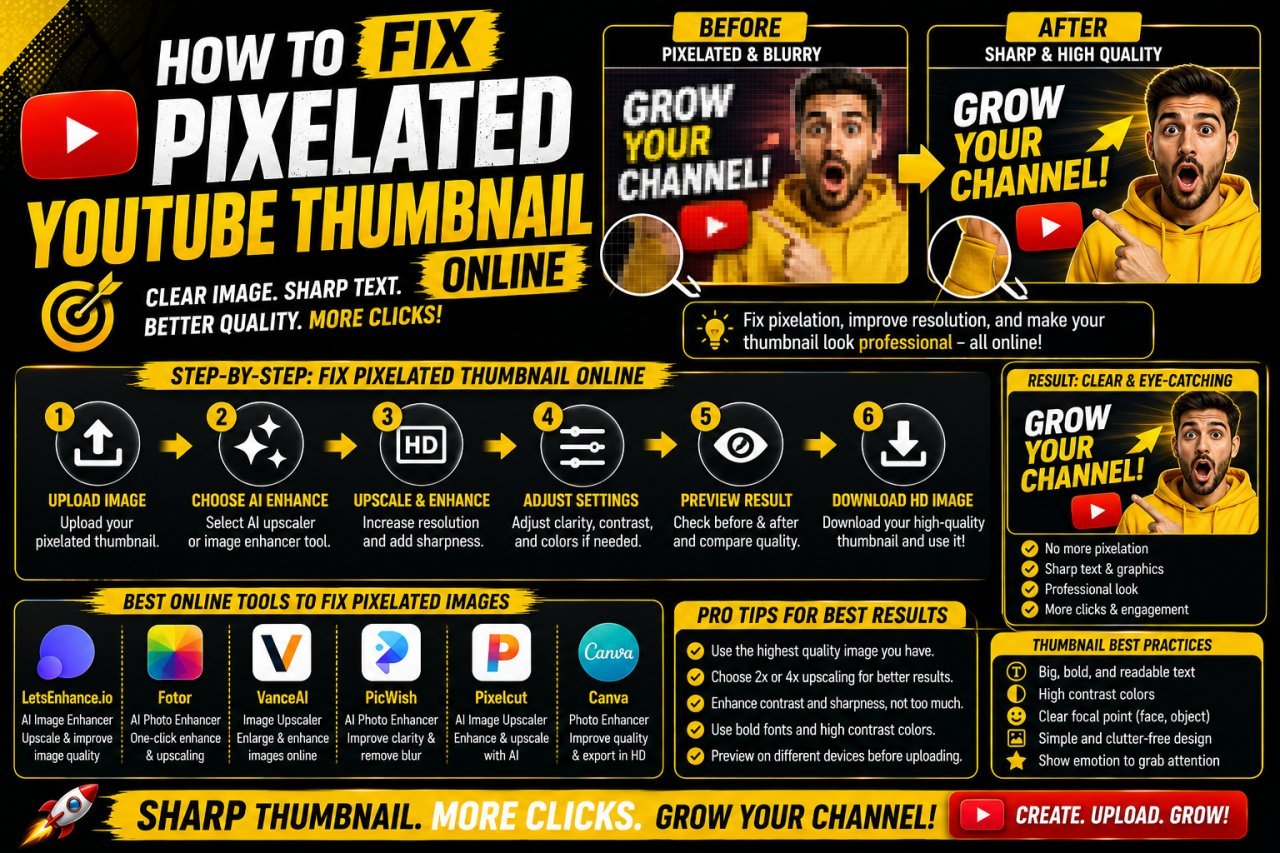
How to Fix a Pixelated YouTube Thumbnail Online
A pixelated YouTube thumbnail can make an otherwise good video look unfinished. Large blocks, jagged edges, blurry faces, and rough text can become especially noticeable when a small image is enlarged for a thumbnail.
If you're wondering how to fix a pixelated YouTube thumbnail online, the first thing to understand is that pixelation usually comes from insufficient image detail, excessive enlargement, compression, or a poor-quality source file.
The good news is that you can often improve the appearance of a pixelated image using an online image editor or enhancement tool.
You can resize the image correctly, use careful upscaling, sharpen important details, improve contrast, simplify the background, and export the final thumbnail properly.
However, there is one important limitation: you cannot always recover detail that has already been lost. If the original image is extremely small or heavily damaged, replacing it with a better source may produce a better result than applying more filters.
For a standard horizontal YouTube video, YouTube currently recommends a 16:9 aspect ratio and recommends high-resolution video thumbnails, including 3840 × 2160 pixels. YouTube also specifies a minimum width of 640 pixels. YouTube Help — Add custom thumbnails
This guide explains how to diagnose pixelation and improve your thumbnail online without making it look artificially processed.
Why Does a YouTube Thumbnail Become Pixelated?
Pixelation happens when the individual pixels in an image become visible or are used to represent details that the original image did not contain.
This often happens when a small image is enlarged too much.
For example, imagine you have an image that is:
500 × 350 pixels
You enlarge it dramatically to create a large thumbnail.
The editing software has to create additional pixels or estimate information between existing pixels.
The result can look:
- Blocky
- Soft
- Jagged
- Blurry
- Noisy
- Artificial
- All Tools
Common Causes of Pixelation
A YouTube thumbnail may become pixelated because of:
- A very small original image
- Excessive image enlargement
- Repeated resizing
- Heavy JPG compression
- Low-quality screenshots
- Saving an image multiple times
- Cropping too aggressively
- Poor export settings
- Starting with an already pixelated image
Finding the cause is important because different problems require different solutions.
How to Tell if Your YouTube Thumbnail Is Pixelated
Before editing the image, inspect it closely.
You may notice pixelation around:
- Faces
- Hair
- Text
- Logos
- Product edges
- Clothing
- Straight lines
- Small objects
Zoom In to Inspect the Image
Open the original image in an image editor and zoom in.
Look at the edges of important objects.
If you see obvious square blocks or rough stair-step edges, the image may have insufficient resolution.
Then Zoom Out
Don't judge the thumbnail only while zoomed in.
A thumbnail is normally viewed much smaller than the original working canvas.
Check the image at both:
100% zoom — to inspect technical quality
and
small preview size — to judge the actual thumbnail appearance.
Sometimes a small amount of pixelation visible at 100% is not noticeable when the complete thumbnail is viewed at a smaller size.
The goal is to make the final design look clear and natural, not to make every pixel perfect under extreme zoom.
Step 1: Find the Best Original Image
Before trying to fix pixelation, look for a better version of the image.
This is often the most important step.
If you're using a photograph from your own video or camera, check whether you have:
- The original photo
- The original video frame
- A higher-resolution screenshot
- The original project file
- An uncompressed image
- A larger version of the source
Avoid taking a screenshot of an image that has already been compressed if the original file is available.
Why the Original Matters
Imagine the image has gone through this process:
Original → compressed image → screenshot → resized image → thumbnail
Each unnecessary step can make the source harder to work with.
A better workflow is:
Original → thumbnail design → final export
Start with the cleanest source you can access.
If You Don't Have a Better Source
That's okay.
You can still try:
- Careful upscaling
- Moderate sharpening
- Contrast improvement
- Better cropping
- Background treatment
- Cleaner thumbnail composition
Just keep expectations realistic.
Step 2: Create the Correct YouTube Thumbnail Canvas
For a standard horizontal YouTube video, use a 16:9 canvas.
Common 16:9 sizes include:
| Canvas size | Aspect ratio | Suitable for |
|---|---|---|
| 1280 × 720 px | 16:9 | Standard HD workflow |
| 1920 × 1080 px | 16:9 | Full HD workflow |
| 2560 × 1440 px | 16:9 | Higher-resolution workflow |
| 3840 × 2160 px | 16:9 | YouTube's recommended high-resolution size |
YouTube's current Help documentation recommends 3840 × 2160 pixels for video thumbnails and specifies a minimum width of 640 pixels. YouTube Help — Add custom thumbnails
Don't Stretch the Image
If your source image doesn't match 16:9, don't simply drag the corners until it fills the canvas.
That can distort:
- Faces
- Products
- Buildings
- Cars
- People
- Logos
Instead, maintain the original proportions and decide whether to crop, position, or create a suitable background.
A correctly proportioned image will usually look more professional than a distorted one.
Step 3: Resize the Image Carefully
Resizing is one of the most important parts of fixing a pixelated thumbnail.
If the image is too small, you may need to enlarge it.
But avoid making the image dramatically larger than necessary.
For example:
800 × 600 → 1200 × 900
is a smaller enlargement than:
400 × 300 → 3840 × 2880
The second example requires much more interpolation.
Keep the Aspect Ratio Locked
When resizing online, look for an option such as:
- Lock aspect ratio
- Maintain proportions
- Constrain proportions
This prevents accidental stretching.
Don't Repeatedly Resize
Try to perform the main resize once.
Repeatedly enlarging and shrinking an already compressed image can gradually reduce quality.
Keep your original source and make changes from that file whenever possible.
Step 4: Try Image Upscaling
Image upscaling increases the dimensions of a small image.
Basic resizing estimates additional pixels using mathematical interpolation.
More advanced enhancement tools can use different processing techniques to produce a larger image that may appear more detailed.
This can be useful for YouTube thumbnails when the source image is too small.
What Upscaling Can Improve
Depending on the original image, upscaling may help produce:
- Smoother edges
- Cleaner shapes
- Better-looking enlargement
- More usable facial details
- Less obvious pixelation
What Upscaling Cannot Guarantee
Upscaling cannot guarantee recovery of the exact original detail.
If a tiny image contains almost no information about a person's face, an enhancement tool has limited information to work from.
The result may therefore look:
- Artificial
- Over-smoothed
- Over-sharpened
- Different from the original
Always inspect the result before using it.
A natural-looking image is better than an aggressively enhanced image that no longer looks authentic.
Step 5: Sharpen the Thumbnail Carefully
After resizing, your image may appear slightly soft.
Sharpening can improve the perceived definition of edges.
However, sharpening is not the same as restoring resolution.
It works by increasing local contrast around edges, which can make details appear more defined.
Signs You Have Sharpened Too Much
Reduce the sharpening if you notice:
- White or dark halos
- Rough outlines
- Excessive noise
- Harsh skin texture
- Jagged edges
- Artificial-looking details
Use the lowest amount that makes a useful improvement.
Sharpen After Resizing
As a general editing workflow, it often makes more sense to evaluate sharpness after the image has reached its intended working size.
That way, you are judging the appearance of the image in its final context rather than sharpening an image that you will later enlarge again.
Step 6: Improve Contrast and Subject Separation
A thumbnail can sometimes look unclear even when the resolution isn't the biggest problem.
Poor lighting or weak contrast can make an image feel flat.
Small adjustments to:
- Brightness
- Contrast
- Highlights
- Shadows
- Exposure
may make the main subject easier to see.
For example, if a person is standing against a background with similar colors, separating the subject from the background can make the thumbnail appear clearer.
Focus on What Matters
Don't try to make every part of the image equally detailed.
Instead, prioritize:
Face → Product → Main object → Thumbnail text
The viewer should immediately understand the main visual idea.
A clean composition can make a bigger difference than applying another sharpening filter.
Step 7: Use a Cleaner Background
If the original image is pixelated, a detailed background can make the problem more noticeable.
A simple background can help.
You could use:
- A blurred version of the original image
- A simple color
- A gradient
- A clean graphic background
- A less detailed section of the original image
A Simple Background Technique
Place the original image on the foreground.
Then create a larger duplicate behind it.
Enlarge the background copy and blur it.
This allows the foreground to remain the primary focus while the background fills the 16:9 canvas.
The technique is particularly useful when your source image is:
- Portrait
- Square
- Smaller than the canvas
- Surrounded by unwanted empty space
The background should support the subject rather than draw attention away from it.
Advanced Ways to Fix a Pixelated YouTube Thumbnail Online
If basic resizing does not give you a clean result, you can combine several editing techniques.
The key is to improve the image gradually instead of applying every available enhancement at maximum strength.
A practical workflow is:
Upscale → Adjust → Sharpen → Clean up → Add design elements → Export
This gives you more control over the final appearance.
Try an Online AI Image Enhancer
Some online image-enhancement tools can enlarge low-resolution images and attempt to improve their visual detail.
This can be helpful when your original thumbnail image is too small.
For example, you may have an old video frame that looks acceptable at its original size but becomes blurry when enlarged.
An image enhancement tool may produce a more usable version.
When AI Enhancement Can Help
It can be useful for:
- Small photographs
- Low-resolution video frames
- Slightly blurry portraits
- Product images
- Older images
- Images that need moderate enlargement
Don't Expect Miracles
AI enhancement should not be treated as a way to recover guaranteed original detail.
When an image contains very little information, an enhancement system has to estimate what the missing details might look like.
This can sometimes produce unusual results, especially around:
- Faces
- Hair
- Fingers
- Text
- Logos
- Complex patterns
Always compare the enhanced image with the original.
If the enhanced version looks unnatural, use a less aggressive setting or find a better source image.
Simplify the Thumbnail Instead of Fixing Everything
You don't necessarily need to improve every pixel in the image.
A thumbnail is a small visual.
If the background contains low-quality details that don't contribute to the message, remove or hide them.
For example, imagine a gaming thumbnail where the main character is clear but the distant background is heavily pixelated.
You could:
- Blur the background
- Darken it
- Reduce its detail
- Crop it
- Replace it with a simple graphic
This puts attention on the part of the image that matters.
Use the Low-Quality Area Strategically
Sometimes the best solution isn't to repair a damaged area.
Instead, turn it into a background element.
This can make the overall thumbnail look cleaner without requiring advanced image restoration.
Add Thumbnail Text Separately
If the original image contains blurry or pixelated text, don't simply enlarge that text.
Recreate it using a clean font in your online editor.
This is particularly important for:
- Titles
- Numbers
- Labels
- Prices
- Short phrases
- Brand elements
Vector-style text created directly inside an editor will generally remain cleaner when resized than text that has already been baked into a tiny raster image.
Keep Text Simple
Use:
- Large font size
- Clear lettering
- Strong contrast
- Adequate spacing
- One or two font families
Avoid putting tiny text into the thumbnail.
If the viewer needs to zoom in to understand it, it probably isn't doing its job.
Rebuild Important Logos or Graphics
If a logo becomes pixelated after enlargement, look for the original logo file.
A vector version is especially useful because vector graphics can be resized without the same type of pixelation associated with raster images.
If you don't have the original logo, consider creating a clean simplified version rather than enlarging a tiny copy repeatedly.
Why This Helps
A thumbnail may contain only a few important graphic elements.
If the logo, text, or icon is blurry, the entire design can feel lower quality even when the main photograph is reasonably sharp.
Keep small branding elements simple and readable.
Use Smart Cropping
Cropping can sometimes improve the appearance of a pixelated thumbnail because it removes distracting or low-quality areas.
For example, if the center of a photograph is relatively sharp but the outer edges are noisy, you may be able to create a tighter composition around the stronger area.
However, don't crop so aggressively that the remaining subject becomes extremely enlarged.
A Good Cropping Question
Ask:
"Does this crop make the main subject clearer?"
If the answer is yes, keep it.
If the crop forces you to enlarge a low-resolution face or product until it becomes heavily pixelated, use a different composition.
Compare Before and After Results
Don't automatically choose the strongest enhancement.
Create a few versions and compare them.
| Version | Possible Result | What to Check |
|---|---|---|
| Original | Natural but low resolution | Overall clarity |
| Light enhancement | Slight improvement | Natural appearance |
| Medium enhancement | More visible detail | Edges and faces |
| Strong enhancement | More processed | Artificial details |
| Replaced source | Potentially cleaner | Authenticity and quality |
The best result is usually the one that looks clear without looking obviously overprocessed.
This is especially important for people, products, and recognizable objects.
Example: Fixing a Pixelated Face in a Thumbnail
Suppose you have a 600-pixel-wide video frame showing a person.
You want to use the person as the main subject in a larger thumbnail.
Simply enlarging the entire frame may make the face look soft and pixelated.
A better workflow could be:
- Find the highest-resolution original frame available.
- Crop the person carefully.
- Upscale the image moderately.
- Check facial details.
- Apply light sharpening if necessary.
- Simplify the background.
- Add short, clean text separately.
- Reduce the thumbnail to a small preview.
- Compare it with the original.
- Export the best-looking version.
If the face still looks unnatural after enhancement, don't keep increasing the sharpening.
Instead, find another frame from the video where the person is better lit and more clearly captured.
Choosing a better source frame can be more effective than repeatedly editing a poor one.
Example: Fixing a Pixelated Product Image
Imagine you're creating a technology review thumbnail.
Your product image is small and becomes blurry when enlarged.
Instead of stretching it across the entire canvas:
- Keep the product at a reasonable size.
- Place it against a simple background.
- Use contrast to separate it from the background.
- Add a short headline.
- Use a clean product image if another source is available.
- Avoid tiny product details that become unreadable.
You don't always need the product to fill the entire thumbnail.
A clean composition can make a moderately sized product image look more professional.
Pixelated vs Blurry vs Low-Resolution Images
These problems are related but not exactly the same.
| Problem | What It Looks Like | Common Cause | Useful Approach |
|---|---|---|---|
| Pixelated | Visible blocks or jagged pixels | Excessive enlargement | Better source or careful upscaling |
| Blurry | Soft or undefined edges | Focus, motion, compression, or resizing | Moderate sharpening or better source |
| Low resolution | Not enough image dimensions | Small original file | Higher-resolution source or upscaling |
| Compressed | Blocky artifacts and lost detail | Excessive compression | Re-export from original |
| Oversharpened | Harsh edges and halos | Too much sharpening | Reduce sharpening |
Identifying the actual problem helps you choose the right solution.
For example, sharpening a heavily compressed image may make its compression artifacts more obvious rather than fixing them.
Pros and Cons of Different Pixelation Fixes
| Method | Pros | Cons |
|---|---|---|
| Better original image | Best starting point | May not be available |
| Basic resizing | Simple and fast | Cannot create genuine missing detail |
| AI upscaling | Can improve some low-resolution images | May create artificial details |
| Sharpening | Can improve perceived definition | Too much creates halos and noise |
| Background blur | Hides distracting low-quality detail | Doesn't restore the subject |
| Cropping | Removes weak areas | May require more enlargement |
| Recreating text | Produces cleaner typography | Requires redesigning the text |
| Replacing image | Can provide a major quality improvement | May require finding another source |
There is no single fix that works for every pixelated image.
The best method depends on how severe the original quality problem is.
Call To Action
Have a blurry or pixelated image that you want to turn into a cleaner YouTube thumbnail?
Use Image EditPro to resize, enhance, sharpen, crop, and prepare your image online. You can also create a clean thumbnail layout and add readable text without relying on complicated desktop software.
Fix the image quality, clean up the design, and prepare your next YouTube thumbnail with a simple online workflow.
1. How can I fix a pixelated YouTube thumbnail online?
Start with the highest-quality original image available. Then resize it carefully, use moderate image upscaling if necessary, apply light sharpening, improve contrast, simplify the background, and export the final thumbnail from the best available source.
2. Why does my YouTube thumbnail look pixelated?
A thumbnail can look pixelated when a low-resolution image is enlarged too much. Other causes include repeated resizing, heavy compression, low-quality screenshots, aggressive cropping, or starting with an image that is already pixelated.
3. Can I make a pixelated image HD?
You can increase the image dimensions and improve its appearance with upscaling and enhancement tools, but you cannot guarantee recovery of detail that was not present in the original image. A better source image usually gives better results.
4. What is the best size for a YouTube thumbnail?
For standard horizontal YouTube videos, YouTube currently recommends a 16:9 thumbnail with 3840 × 2160 pixels. The official documentation also specifies a minimum width of 640 pixels. YouTube Help — Add custom thumbnails
5. Does sharpening fix pixelation?
Sharpening can improve the perceived definition of an image, but it does not restore missing resolution. Excessive sharpening can make pixelation, noise, and compression artifacts more noticeable.
6. Is AI upscaling good for YouTube thumbnails?
AI-based upscaling can be useful when a thumbnail image needs moderate enlargement. Results vary depending on the original image, and aggressive enhancement can sometimes create unnatural details, especially around faces, text, and complex objects.
7. How do I fix a blurry YouTube thumbnail without losing quality?
Use the highest-quality original file, resize it only as much as necessary, apply moderate sharpening after resizing, and avoid repeatedly saving compressed versions. If possible, use a better source image instead of trying to repair a severely blurry file.
8. Why does my thumbnail become blurry after resizing?
Resizing can make an image appear softer when the new dimensions require interpolation or when a small source image is enlarged significantly. Using a higher-quality source and limiting unnecessary enlargement can help.
9. How can I improve a low-resolution YouTube thumbnail?
Use a higher-resolution original if available. If not, moderate upscaling, careful sharpening, contrast adjustments, smart cropping, and background simplification can improve the overall appearance.
10. Can I fix a pixelated YouTube thumbnail without Photoshop?
Yes. Basic thumbnail improvement can be done with online image editors and enhancement tools. You can resize, crop, sharpen, adjust contrast, simplify backgrounds, add text, and export the final design directly from a browser-based workflow.
Ready to optimize your images?
Every tool mentioned in this article is free to use. No upload, no signup, and no watermarks — ever.
Try our free toolsRelated articles
How to Improve YouTube Thumbnail Quality on a Low-Resolution Image
Learn how to improve YouTube thumbnail quality on a low-resolution image using resizing, sharpening, background techniques, compression control, and better export settings.
How to Make a YouTube Thumbnail Look Professional Online
Learn how to make a YouTube thumbnail look professional online with better layouts, images, text, colors, branding, and simple design techniques.
How to Make YouTube Thumbnail Text Clear and Sharp
Learn how to make YouTube thumbnail text clear and sharp with better fonts, sizing, contrast, spacing, outlines, export settings, and simple design techniques.